.jpeg)
Add the domain you use for DKIM signing (or your SPF/Return-Path domain) to Postmaster Tools and verify it with the TXT or CNAME record Google provides. Once verified, you get Gmail-only dashboards for spam rate, domain and IP reputation, authentication, encryption, and delivery errors, though data only appears after verification and enough Gmail-bound traffic. If you want a hands-off setup, a managed service can configure this for you.
TL;DR:
- Register the DKIM signing domain shown in a production email’s d= header, or the SPF return path domain Gmail evaluates, then add Google’s DNS record.
- Complete verification before expecting data; Google withholds metrics until the domain receives enough mail at personal Gmail and Googlemail addresses.
- Keep spam complaints below roughly 0.1%, and treat a sustained rate above 0.3% as a reputation risk that warrants campaign and list review.
- Multi domain teams can use the API for scheduled exports and spam rate alerts, while checking inbox placement and list hygiene separately.
Table of Contents
- Step-by-Step: Add Your Domain in Postmaster Tools and Verify It via DNS
- Pre-Setup Checklist: Accounts, DNS Access, and Volume Expectations
- How to Read Each Postmaster Tools Dashboard
- Fixes for Verification Failures and Missing Data
- When to Use the Postmaster Tools API and How to Get Started
- Where Postmaster Tools Fits in a Deliverability Workflow
- How We Help You Set Up and Monitor Gmail Deliverability
- FAQ
- Sources
Step-by-Step: Add Your Domain in Postmaster Tools and Verify It via DNS
Setting up Postmaster Tools takes a few minutes at the console, but DNS propagation can stretch the timeline. Work through these steps in order:
- Sign in with a Google account and open Postmaster Tools, then go to “Manage domains” and select “Add new domain.”
- Decide which domain to register. Check a recent message’s raw headers for the DKIM signature line: the
d=value is your DKIM domain. If you authenticate primarily through SPF, look at the Return-Path header instead. Google recommends matching the domain you actually use for authentication, since Postmaster Tools won’t collect meaningful data on a domain Gmail never sees in the headers. - Copy the TXT or CNAME verification record Postmaster Tools displays on screen.
- Add that exact record to your DNS zone through your domain registrar or DNS host.
- Allow time for propagation. Most DNS changes resolve within minutes, though some records take longer depending on your provider’s TTL settings.
- Return to Postmaster Tools and click “Verify.”
If verification doesn’t succeed right away, you’ll see a “Not now” option. Choosing it lets you exit the flow, but no dashboard data will populate until the domain is actually verified, so it’s worth coming back to finish the record check rather than leaving it unresolved.
A few situations need extra attention. If you sign with DKIM across multiple subdomains or use more than one DKIM selector, verify the domain that matches the d= value your sending platform applies most consistently. For agencies managing several client domains, each one needs its own verification record and its own entry in “Manage domains.” Team members who need dashboard access can be added as users under the verified domain’s settings, which avoids sharing a single login across a whole team.
Pro Tip: Pull a header sample from an email you’ve actually sent through your production system, not a test message from a staging environment, since the authentication domain can differ between the two.
Pre-Setup Checklist: Accounts, DNS Access, and Volume Expectations
Before you start, confirm the basics so you’re not stuck mid-setup waiting on access you don’t have.
- You need a Google account (personal or Google Workspace) to log into Postmaster Tools.
- You need DNS control for the domain you’re verifying, either direct access or a contact who can add records quickly.
- Check your authentication setup first: inspect message headers for the DKIM
d=value and the Return-Path domain so you register the one Gmail actually evaluates. - Expect Google to suppress dashboard metrics at low sending volume, since Postmaster Tools applies privacy thresholds that hide data until a domain sends enough mail to personal Gmail and Googlemail addresses.
- Use a DNS propagation checker and a header inspector before verifying, so you catch typos in the TXT or CNAME record before they cost you a cycle.
How to Read Each Postmaster Tools Dashboard
Once data starts flowing, the real work begins: turning six dashboards into a short list of fixes.
- Spam rate tracks the share of your Gmail-delivered mail that recipients mark as spam. Gmail’s own guidance says to keep this below roughly 0.1% and avoid crossing 0.3%, since higher rates drag down domain reputation and push more mail into spam folders automatically.
- Domain reputation reflects sending behavior tied to your domain regardless of which IP sent the message, while IP reputation tracks behavior tied to a specific sending IP. Domain-level issues usually need content and list fixes; IP-level issues often point to a specific server or ESP pool that needs isolation or warm-up.
- Authentication shows SPF, DKIM, and DMARC pass rates. A sudden drop usually traces back to an expired DKIM key, a missing SPF include after a provider switch, or a DMARC policy that’s stricter than your current setup supports.
- Encryption reports the percentage of inbound and outbound mail sent over TLS. A low percentage means some of your traffic travels unencrypted, which is worth raising with your sending platform or mail server admin.
- Delivery errors lists SMTP error codes Gmail returned, such as a 550 5.7.1 rejection tied to policy or formatting problems. The Email sender guidelines page documents what these codes mean and where to start diagnosing them.
- Compliance status flags whether your sending pattern matches Gmail’s bulk sender requirements, which is the dashboard worth checking first if you send at volume.
A spam rate sustained above 0.3% is the threshold Gmail flags as a reputation risk, according to Google’s own sender guidance. That single number is often the fastest signal that something in your list or content needs attention before authentication or IP issues even become relevant.
Fixes for Verification Failures and Missing Data
Most setup problems fall into a handful of predictable categories:
- DNS record not found: confirm you copied the exact TXT or CNAME string Postmaster Tools gave you, check your zone’s TTL, and run the record through a propagation checker before retrying verification.
- Wrong domain entered: go back to the message headers and recheck the DKIM
d=value or Return-Path domain. If they differ, you likely registered the domain Gmail doesn’t actually evaluate. - Dashboards show no data after verification: this usually means Gmail-directed volume hasn’t crossed the privacy threshold yet. Wait rather than re-adding records or re-verifying, since repeated changes don’t speed up data collection.
- Multiple DKIM selectors or subdomains: verify the domain tied to the selector your sending platform uses most often, and register subdomains separately if they authenticate independently.
- Sudden spam-rate spike: pause active campaigns, review recent list additions for hygiene problems, and check whether a specific segment or source is generating a disproportionate number of complaints.
Pro Tip: Dashboard data updates on a delayed, aggregated window, often up to 24 hours, so give a DNS or content change a full day before concluding it didn’t work.
When to Use the Postmaster Tools API and How to Get Started
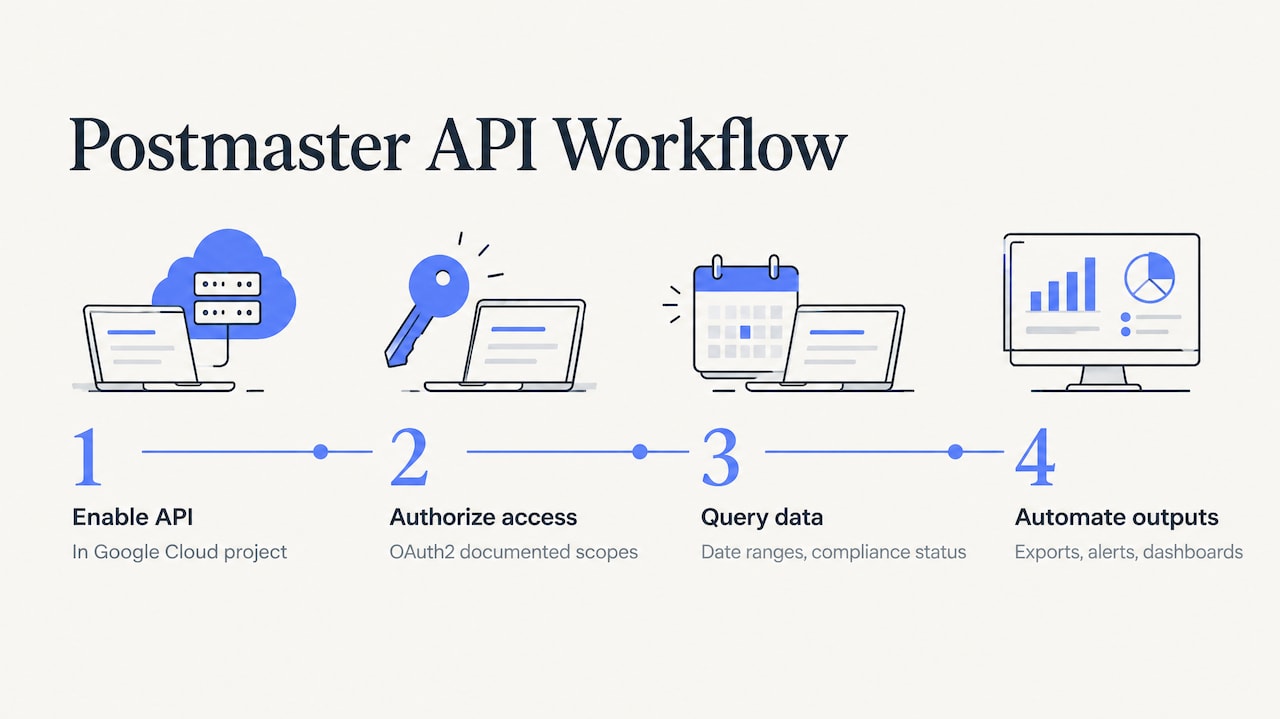
For teams tracking multiple domains or IPs, the Postmaster Tools API lets you pull metrics programmatically instead of checking dashboards by hand. Setup requires enabling the API in a Google Cloud project and authorizing access with OAuth2 using the documented scopes. From there, you can query domain statistics by date range and retrieve compliance status, which supports scheduled exports, automated alerts on spam-rate changes, and feeding Postmaster data into an internal reporting dashboard alongside other deliverability metrics.
Where Postmaster Tools Fits in a Deliverability Workflow
Postmaster Tools is a Gmail-specific early warning system, not a full deliverability picture, so pair it with inbox placement testing and ongoing list hygiene work. Fix authentication gaps and complaint sources before touching IP-level infrastructure. Managed setup and warm-up services can shorten the wait for clean signal.
— Yaro
How We Help You Set Up and Monitor Gmail Deliverability
We built our platform around the same signals Postmaster Tools tracks: authentication accuracy, spam complaints, and sender reputation.
- We offer done-for-you email setup that handles DNS, authentication records, and Postmaster verification for you.
- Our infrastructure includes warm-up and isolated sending IPs designed to help maintain domain and IP reputation.
- Our deliverability monitoring tracks the same categories Postmaster surfaces, so you catch problems before they show up as a spam-rate spike.
If list hygiene is part of what’s driving your spam complaints, pairing Postmaster data with a legitimate list-growth approach matters too, and this guide to growing an email list covers practical ways to do that without triggering the complaint volume that tanks reputation scores. Start with a free trial or check our plans to see which setup fits your sending volume.
FAQ
Where is my Gmail settings?
Gmail settings live inside your inbox: click the gear icon in the top right corner, then select “See all settings.” Postmaster Tools, by contrast, is a separate Google product accessed at a distinct console, not inside your regular Gmail settings menu.
What is postmaster in Gmail?
“Postmaster” refers to Postmaster Tools, Google’s free dashboard for domain owners who send mail to Gmail addresses. It shows spam rate, reputation, authentication, and delivery error data for a domain you’ve verified, but only for mail sent to personal @gmail.com or @googlemail.com addresses.
Why am I getting emails from Postmaster?
Automated “postmaster” emails usually come from a mail server reporting a delivery failure, often called a bounce or non-delivery report. These are generated by mail transfer agents, not by Postmaster Tools itself, and they typically explain which message failed and why.
How do I set up a new mailbox in Gmail?
Setting up a new Gmail mailbox requires creating a Google account, which Google walks you through at its account creation page. For business sending, pairing that mailbox with proper authentication and a verified domain in Postmaster Tools matters more for deliverability than the mailbox creation step itself.
Sources
- Set up Postmaster Tools - Gmail Help
- Email sender requirements and Postmaster Tools FAQ - Gmail Help
- Postmaster Tools API: setup and authorization - Google Developers